How to use Docker Compose to Build and Run a Node.js and React Web Application

Docker is a powerful tool that allows you to create, deploy, and run applications using containers. Containers are isolated environments that contain everything your application needs to run, such as code, libraries, and configuration files. Containers make your application more portable, scalable, and reliable.
But what if your application consists of multiple components that need to communicate with each other? For example, a web application might have a front-end, a back-end, and a database. How can you manage all these containers and make sure they work together?
That's where Docker Compose comes in. Docker Compose is a tool that lets you define and run multi-container Docker applications. With Docker Compose, you can specify your application's components in a YAML file, and then launch them all with one command. Docker Compose takes care of creating the containers, setting up the network, and linking the services.
Some of the benefits of using Docker Compose are:
Simplicity: You can define your entire application stack in a single file, and then use one command to start, stop, or rebuild it.
Reproducibility: You can ensure that your application is always deployed in the same environment, regardless of where you run it. This makes it easier to debug and test your application.
Portability: You can deploy your application to any machine that has Docker installed, without worrying about compatibility issues.
Scalability: You can scale your application by increasing the number of replicas of your services, or by using load balancing and clustering tools.
In this article, you will learn how to use Docker Compose to build and run a web application using Node.js and React. Node.js is a JavaScript runtime that allows you to create server-side applications. React is a JavaScript library that allows you to create user interfaces.
Prerequisites
Before you begin, make sure you have the following prerequisites:
Docker installed on your machine
Basic knowledge of Node.js and React
Setting up a Node.js backend
Create a directory called
node-react-appand cd into it. In this directory, make a new directory calledbackendand cd into it.Initialize the application:
npm init -yThis will create a package.json file in the directory.
Install dependencies:
npm install express corsOpen the folder in a code editor and make a new file called
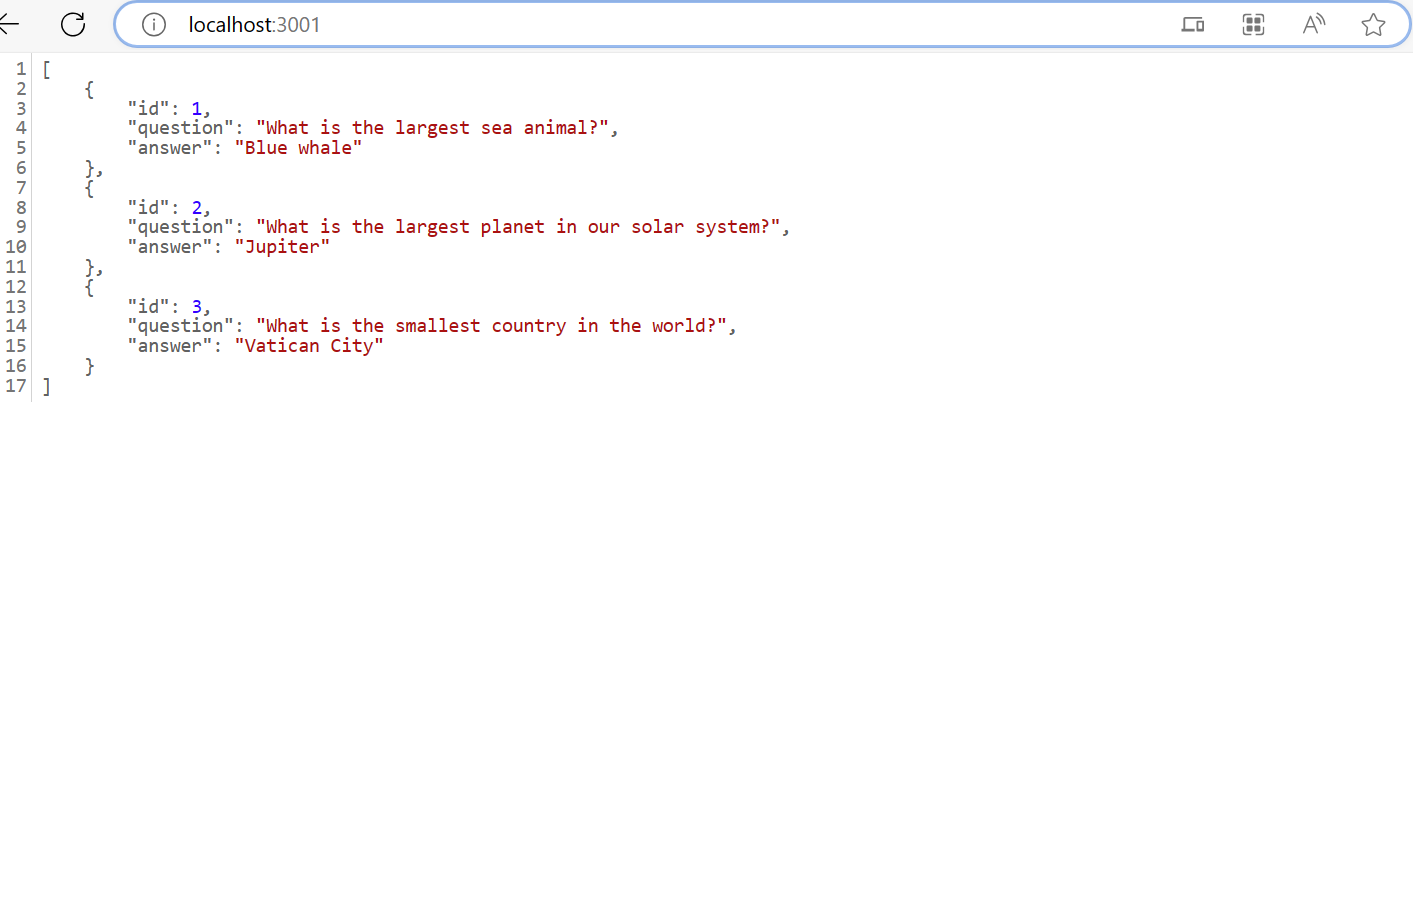
server.jsand paste in the following:const express = require("express") const app = express() const port = 3001 const cors = require("cors") app.use(cors()) app.get("/", (req, res) => { const questions = [ { id: 1, question: "What is the largest sea animal?", answer: "Blue whale", }, { id: 2, question: "What is the largest planet in our solar system?", answer: "Jupiter", }, { id: 3, question: "What is the smallest country in the world?", answer: "Vatican City", }, ] res.json(questions) }) app.listen(port, () => { console.log(`Server running on port ${port}`) })This creates a web server and responds to a GET request at the root path ("/") with a JSON array of questions and answers. It uses the express and cors modules to handle requests and enable cross-origin resource sharing.
Start the server:
npm start
The server will start at http://localhost:3001/

Creating a React frontend
In the
node-react-appdirectory, create a new react app:npx create-react-app frontendCd into
frontend.Empty the
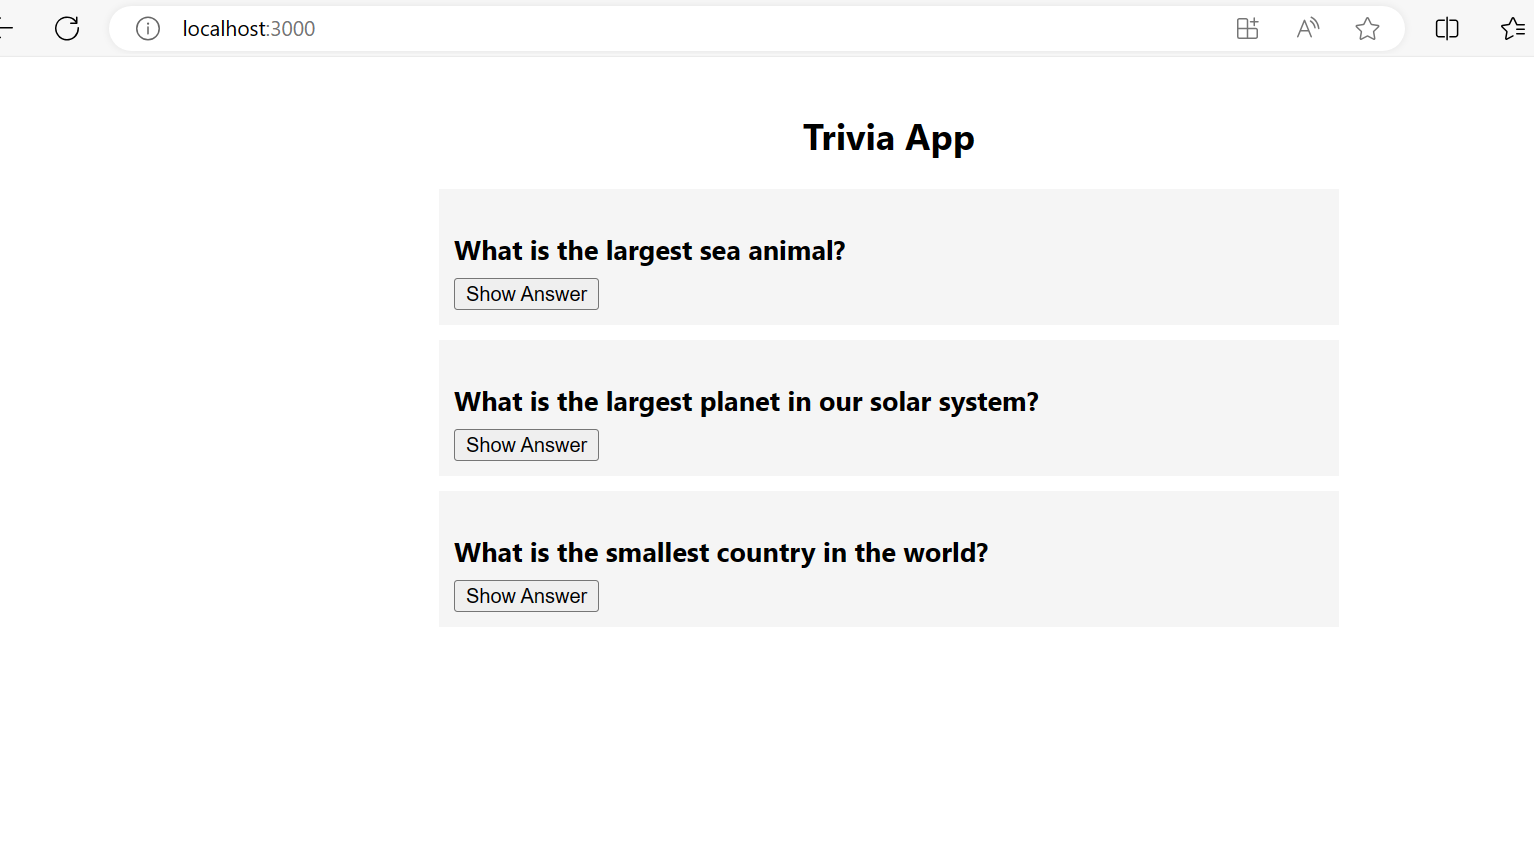
App.jsfile insrcdirectory and paste in the following:import React, { useEffect, useState } from "react" import "./App.css" const App = () => { const [questions, setQuestions] = useState([]) useEffect(() => { fetch("http://localhost:3001") .then((response) => response.json()) .then((data) => setQuestions(data)) .catch((error) => console.log(error)) }, []) const handleShowAnswer = (questionId) => { setQuestions((prevQuestions) => prevQuestions.map((question) => { if (question.id === questionId) { return { ...question, showAnswer: true } } return question }) ) } return ( <div className="container"> <h1 className="title">Trivia App</h1> {questions.map((question) => ( <div key={question.id} className="question-container"> <h3 className="question">{question.question}</h3> {question.showAnswer ? ( <p className="answer">Answer: {question.answer}</p> ) : ( <button className="show-answer-button" onClick={() => handleShowAnswer(question.id)} > Show Answer </button> )} </div> ))} </div> ) } export default AppThis fetches the list of questions from the backend API and displays them to the user.
Run the app:
npm start
Note: you have to keep the backend server running.
You can view the app at http://localhost:3000/

Writing Dockerfiles
Creating a Dockerfile for the Node.js backend
Create a new file called Dockerfile in the backend directory and add the following code:
# Use an official Node.js runtime as the base image
FROM node:alpine

# Set the working directory in the container
WORKDIR /app

# Copy package.json and package-lock.json to the working directory
COPY package*.json ./

# Install the dependencies
RUN npm install

# Copy the rest of the application code to the working directory
COPY . ./

# Expose a port (if your application listens on a specific port)
EXPOSE 3001

# Define the command to run your application
CMD [ "npm", "start" ]
This Dockerfile tells Docker to use the node:alpine image as the base image. It then copies the contents of the current directory into the container and sets the working directory to /app. Next, it installs the required dependencies and exposes port 3001. Finally, it starts the Node.js server.
Creating a Dockerfile for the React frontend
Create a new file called Dockerfile in the frontend directory and add the following code:
# Use an official Node.js runtime as the base image
FROM node:alpine

# Set the working directory in the container
WORKDIR /app

# Copy package.json and package-lock.json to the working directory
COPY package*.json ./

# Install the dependencies
RUN npm install

# Copy the rest of the application code to the working directory
COPY . ./

# Expose a port (if your application listens on a specific port)
EXPOSE 3000

# Define the command to run your application
CMD [ "npm", "start" ]
This Dockerfile is similar to the Dockerfile for the Node.js backend.
Compose Configuration
Writing a Docker Compose YAML file
Create a new file called docker-compose.yml in the root directory of your project and add the following code:
version: "3"
services:
  backend:
    build:
      context: ./backend
      dockerfile: Dockerfile
    ports:
      - "3001:3001"
  frontend:
    build:
      context: ./frontend
      dockerfile: Dockerfile
    ports:
      - "3000:3000"
The code above specifies instructions for building the docker compose image.
version: "3": This specifies the version of the Docker Compose file format being used. In this case, it's using version 3. Different versions of Docker Compose may have varying features and syntax.
services: This is the section where you define the various services or containers that make up your application. In this case, we have two services: backend and frontend.
backend and frontend: These are the service names, which you can use to reference and configure each service in your Docker Compose setup.
build: This section specifies how to build the Docker image for each service.
context: ./backend and context: ./frontend: The context specifies the path to the directory where the build context is located. In this case, for the backend service, the build context is in the ./backend directory, and for the frontend service, it's in the ./frontend directory. The build context is where Docker looks for the Dockerfile and any other files that need to be included in the image.
dockerfile: Dockerfile: This line indicates the name of the Dockerfile that should be used for building the image. In both cases, the default Dockerfile named "Dockerfile" located in the specified context directory will be used. If you had a different name for your Dockerfile, you could specify it here.
ports: This section defines port mapping, which allows you to expose ports from the container to the host system.
- "3001:3001" and - "3000:3000": These lines specify the port mapping for the backend and frontend services, respectively. The format is "host_port:container_port". In this example, the backend service will map its port 3001 to the host's port 3001, and the frontend service will map its port 3000 to the host's port 3000. This allows you to access the services from your host machine.
Building and starting the container
To build the container run:
docker-compose up
This will build and start the containers:
Output:

The backend is running on http://localhost:3001/
The frontend is running on http://localhost:3000/
Conclusion
In this article, you have learned how to use Docker Compose to build and run a web application using Node.js and React. You have seen how Docker Compose simplifies the management of multi-container applications.
You have also learned how to create a Dockerfile for each component of your application, how to define your services in a docker-compose.yml file, how to launch your application with docker-compose up, and how to interact with your application using a web browser. Thank you for reading!


